
Imagine you have just hit a powerful drive right along the fairway.
The next thing one would do is hop on their golf cart and ride across the lush green towards the ball, right?
Well, the problem occurs when your cart comes to a sudden halt, and you have no clue why.
Usually, it’s the battery playing foul, and if you’ve newly bought a golf cart, it’s important to know how to charge a golf cart correctly.
This post offers a comprehensive, easy-to-follow guide covering everything you need to know about charging golf cart batteries, timing, maintenance, and everything else.
Key Takeaways
- Check your golf cart battery’s manual and gather the supported charger.
- Charge your golf cart battery in a well-ventilated area avoiding moisture and extensive heat.
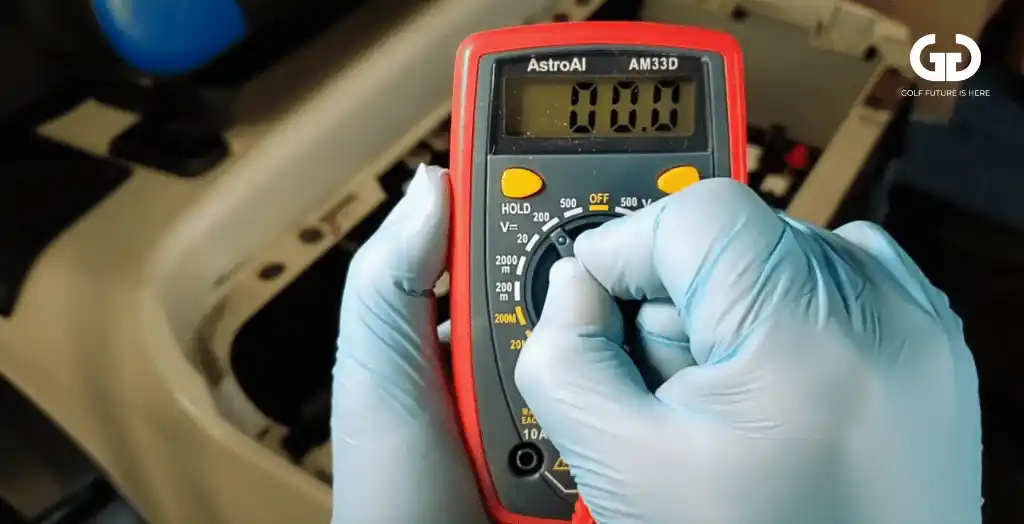
- Monitor your charge with a digital multimeter to ensure your battery is receiving the designated nominal voltage.
- Avoid undercharging to prevent low riding time and overcharging for longer battery life.
6 Easy Steps To Charge Your Golf Cart Battery
Charging golf cart batteries doesn’t have to be complicated. All you need to do is follow a few basics, and you should be good to go.
Step 1: Getting Everything In Place
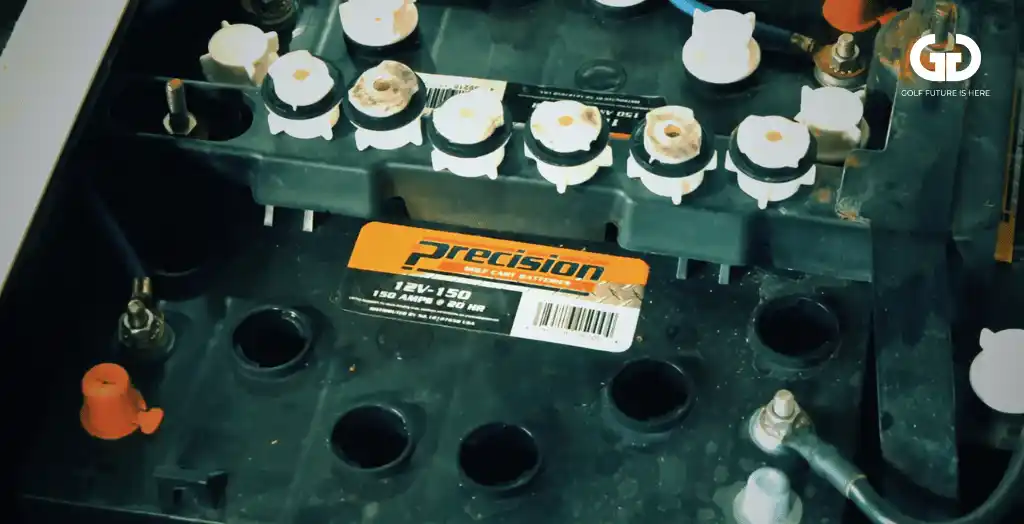
Before you recharge your golf cart, you must gather the essential items; the charger and a battery. While most golf cart models use a 36-volt charger, some older models only work with a 48-volt golf cart charger.
So, always refer to the owner’s manual to know the prerequisites for charging your golf cart. Remember, working with incorrect voltage for your golf cart’s battery can significantly reduce lifespan.
Talking of lifespan, lead acid batteries are known to last anywhere between two to five years, while lithium-ions last anywhere between ten to twenty if you maintain them right. Again, return to the user manual to ascertain the voltage and amperage of the battery.
Step 2: Always Park Your Golf Cart Someplace Safe
Before charging your cart batteries, ensure your golf cart is parked in a well-ventilated area. This is because charging golf cart batteries involves exposure to carbon monoxide.

Also, watch out for the golf cart battery charger and check if it’s placed on a dry surface that doesn’t absorb too much heat. You must, at all times, refrain from keeping the charger atop your golf cart.
Steer clear from charging if it’s drizzling or too hot and if you are too close to water bodies. A good choice of space for charging your golf cart would be a well-ventilated garage or a shade without any walls.
Step 3: Connecting The Charger To Your Golf Cart
Like any other device you would like to hook up for charging, you start by connecting the positive and negative ends to pre-destined positions.
Before that, you will need to select the golf cart battery charger for the battery, and here you must check its compatibility.
As an off-market purchase, you will be spoilt for choice as several manufacturers produce similar kinds of batteries for golf carts.
So, you will need to focus on the voltage alignment to help present any damage. Fret not! Modern-day golf carts come pre-equipped with chargers so that new golf cart owners don’t have to break a sweat.
However, if you pre-own a golf cart, you might have to put in extra effort.
TIP: Above everything, you should give importance to safety. Wear gloves and safety goggles throughout.
Latex is a good choice of material as you will be handling batteries that contain sulfuric acid, which is not at all skin-friendly and reportedly causes skin burns.
Additionally, remove any rings or bracelets for wearables to mitigate the chance of electrocution. Before charging your golf cart, turn the power off and ensure you have attached the right cables.
Universally, red wires go into the positive terminal, and blacks go to the negative. After you’ve plugged them, recheck to ensure they are secure enough.
Step 4: Plugging The Golf Cart Charger To The Power Source
Now, it’s time to put things to work as you plug the charger into the power source. Start by confirming the amperage reading displayed on the charger.
It would help if you aimed for an approximate value of 21 amps. Many people might need an extension cord to facilitate outdoor charging.
Now, there’s a caveat to that, which is choosing an extension cord that has a higher rating compared to the charger’s requirement.
It’s a wise call to check the information on the label for both the golf cart battery charger and the extension cable to avoid circuit overload.
Step 5: Monitoring The Charging
After the charging requisites are met, you must ensure that the electrical charge is successfully reaching the battery. To make life easy, use a digital multimeter that will help you monitor the amps and volts.
As you observe the multimeter’s readings, ensure they surpass the designated nominal voltage of the golf cart battery.
Remember, all modern golf cart chargers have a slew of automatic features in place to keep away from overcharging. However, always unplug batteries to play it safe when it reaches full charge.
Keep an eye on the LED indicator to monitor the charging status.
While overcharging is a strict no-no, undercharging your cart is also not a good option. This could lead to low riding time for your golf cart.
Now, don’t whack your brains trying to figure out the ideal charging time for your golf cart. Put them to charge after each use, and you should be good to go.
Step 6: Disconnecting The Golf Cart Charger
When disconnecting the golf cart battery charger, start with the negative terminal, generally represented by the black wire. This is more like a precautionary measure to mitigate short circuits.
When your golf cart is charged, you will want to store and organize the components individually. If you are storing a golf cart charger or a battery, ensure you do so in a dry location and away from direct sunlight.
At all costs, ensure not exceeding 104 degrees Fahrenheit.
Golf Cart Battery Charging Tips
Whether you are a rookie or a seasoned golfer, here are a few pro tips to charge your golf cart the right way.
Always Charge Your Batteries After Every Use
It almost goes without saying. Like your smartphone, always ensure that you are charging golf cart batteries no matter how little they have been used over the day.
The best way to do it is to leave it to charge overnight.
Get Into The Habit of Watering Your Batteries
While new golf cart batteries won’t require watering, older models might need them at regular intervals. Watering your batteries is a good call, especially during peak summers.
Always add water to your batteries when it’s completely charged. The best way to go about it is using distilled water.
Also, never overfill your battery and steer clear from the cap region, as filling it right up to the cap can make the battery overflow acid and take on damage.
Always Clean The Batteries
Batteries are prone to dust and grime and demand cleaning from time to time. However, it’s pretty easy to clean them. All you need is a little bit of baking soda, water, and a brush to wipe the dirt off.
Invest In A High-Quality Golf Cart Charger
If you plan on keeping your golf cart working fine year after year, don’t settle for a cheap charger.
Inarguably, a good quality charger will keep your golf cart’s battery from running out of juice way too soon.
Check Out: Golf Cart Dimensions: Sizing Up Your Perfect Ride
Charging Golf Cart Batteries- What You Shouldn’t Do?
Now that you know a good deal about what you should be doing with your golf cart batteries, know what you shouldn’t be doing at any cost.
Do Not Overcharge The Batteries
Overcharging batteries is never a good idea for more than one reason. When you leave your batteries to charge beyond time, it disturbs the internal temperature of lead-acid batteries.
Plus, it also accounts for higher water consumption and corrosion of positive plates.
Luckily, if you are a new cart owner, things should come pre-equipped with an automatic charger that saves power and shuts off when the battery is fully charged.
Don’t Leave The Plates Out In The Open
Leaving your golf cart batteries in the open for too long can corrode the plates. So, make sure to store your batteries in a clean, dry, and covered location.
Don’t Use An Incompatible Golf Cart Charger
Using an incompatible, low-quality charger can break internal cells and thereby lower the lifespan of your golf cart battery.
So, always make sure you are using a charger that is supplied with the battery or a compatible one from the same manufacturer.
Wrap Up
So, with a little bit of caution and following a bunch of basic rules, you can charge your golf cart nicely and easily.
FAQs
How long does a cart battery take to charge?
The most commonly found batteries in golf carts are lead acid batteries, which typically take between eight to twelve hours for a full charge. Fast golf cart chargers can reduce this duration by at least fifty percent.
Should I charge my golf cart battery after every use?
Well, ideally, you should! It is advisable to plug your golf cart battery to charge even if the duration is as short as 15 minutes. Doing so ensures extended battery life, particularly during the initial phases of battery use, where complete charging holds substantial importance.
Should I be charging the battery while driving?
That’s a big no right there! Charging a golf cart while operating is never advisable due to safety concerns. Remember, powering the cart during charging is a pivotal safety requirement. Moreover, the battery consumption rate during operation exceeds the charging rate, which is never a good idea.


0 Comments